
How to style Radio Buttons in pure CSS
A Snapshot weekend project on August 2010
I needed to style radio buttons for a web app backend, and after a quick search on google I realized that nobody have a trick to style this form component without javascript. Inspired by the clever work of Toby Pitman, I’ve invented this quick solution to style radio buttons without javascript or images.
The code was developed to work just on webkit based browsers, and was not tested in any other browser.
Visit the demo page
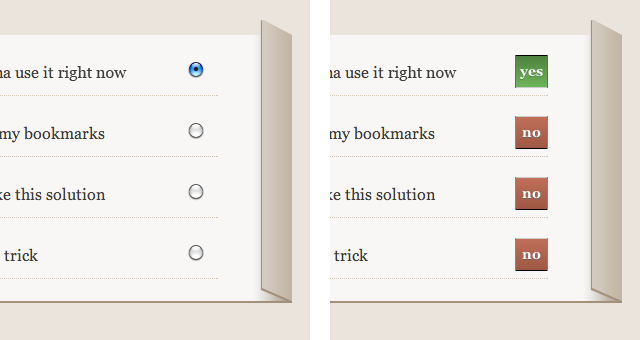
Before and after:
Just add two empty span before and after the radio button, like that:
Here is the commented CSS code (only the essential to do the trick, without the eye-candy):
span{
	position: absolute;
	right: 0;
	width: 25px;
	height: 25px;
	line-height: 25px;
	padding: 3px;
	color: #FFF;
	text-align: center;
	background: red;
}

span:after{
	content: "no"; /*if CSS is disabled span elements are not displayed*/
}

input{
	position: absolute;
	right: 0;
	margin: 0;
	width: 31px;
	height: 31px;
	/*hide the radio button*/
	filter:alpha(opacity=0);
	-moz-opacity:0;
	-khtml-opacity: 0;
	opacity: 0;
        cursor: pointer;
}

input[type="radio"] + span{ /*the span element that immediately follow the radio button */
	visibility: hidden; /*temporarily hide the "YES" label*/
	background: green;
}

input[type="radio"] + span:after{
	content: "yes";
}


input[type="radio"]:checked + span{
	visibility: visible; /*show the "YES" label only if the radio button is checked*/
}